画像やリンクが無効になっている可能性もあるのでご了承下さい。
はじめに
今年に入ってからこのサイトをおさめているサーバー自体と WordPress のチューニングをちまちまと行ってきた。
WordPress は大方済ませた感じなので、今度はサーバーサイドを弄って見ることにした。
大きな所として HTTP プロトコル。1.1 から 2.0 になりパフォーマンスも上がったが、最新の HTTP/3 も気になるところ。
Nginx も HTTP/3 対応の nginx-quic が公開されているので、ビルドして既存のパッケージと切り替える形で動作するようにしてみた。
今回の作業の前提条件
既に HTTP/2.0 までの対応を済ませ、WordPress が動作している状態からの HTTP/3 対応化とする。
Nginx は RPM パッケージから導入した物と同等のファイル構成 (/etc/nginx/nginx.conf とかのパス) とする。
ソースのダウンロードと下準備
CentOS 7 デフォルトの gcc では古くてビルドできないもんだから今回の作業に必要な要件を満たす devtoolset-8 をインストールする。
nginx-quic のリポジトリは Mercurial で管理されているので、使用する hg コマンドの入ったパッケージをダウンロードしてきて localinstall する。
sudo yum install devtoolset-8
wget https://www.mercurial-scm.org/release/centos7/mercurial-6.2.3-1.x86_64.rpm
sudo yum localinstall ./mercurial-6.2.3-1.x86_64.rpm任意の作業ディレクトリでソースを落としてくる。
hg clone -b quic https://hg.nginx.org/nginx-quic
git clone --depth 1 -b openssl-3.0.8+quic https://github.com/quictls/openssl 更に必要であれば Nginx に組み込む module を用意する。
筆者が使用しているのは brotli による encoding 対応と FastCGI Cache を Purge する為の module。アクセス元の Country code を取得する為の geoip2 module となる。
mkdir nginx_modules && cd $_
git clone https://github.com/google/ngx_brotli.git
git clone https://github.com/FRiCKLE/ngx_cache_purge.git
git clone https://github.com/leev/ngx_http_geoip2_module.git
cd ..
HTTP/3 対応 nginx-quic をビルドする
nginx-quic のソースを clone してきたディレクトリに移動して devtoolset 環境に切り替えた後、configure に以下の引数を与えてあげる。prefix 周りは任意で。
--with-http_v3_module と共に --with-stream_quic_module の指定が重要。
正常に終了したら make して sudo make install する。
cd ./nginx-quic
scl enable devtoolset-8 $SHELL
./auto/configure \
--prefix=/usr/local/nginx \
--sbin-path=/usr/local/sbin/nginx \
--modules-path=/etc/nginx/modules \
--conf-path=/etc/nginx/nginx.conf  \
--error-log-path=/var/log/nginx/error.log \
--http-log-path=/var/log/nginx/access.log \
--pid-path=/var/run/nginx.pid \
--lock-path=/var/run/nginx.lock \
--http-client-body-temp-path=/var/cache/nginx/client_temp \
--http-proxy-temp-path=/var/cache/nginx/proxy_temp \
--http-fastcgi-temp-path=/var/cache/nginx/fastcgi_temp \
--http-uwsgi-temp-path=/var/cache/nginx/uwsgi_temp \
--http-scgi-temp-path=/var/cache/nginx/scgi_temp \
--user=nginx \
--group=nginx \
--with-compat \
--with-file-aio \
--with-http_addition_module \
--with-http_auth_request_module \
--with-http_dav_module \
--with-http_flv_module \
--with-http_gunzip_module \
--with-http_gzip_static_module \
--with-http_mp4_module \
--with-http_random_index_module \
--with-http_realip_module \
--with-http_secure_link_module \
--with-http_slice_module \
--with-http_ssl_module \
--with-http_stub_status_module \
--with-http_sub_module \
--with-http_v2_module \
--with-http_v3_module \
--with-mail \
--with-mail_ssl_module \
--with-stream \
--with-stream_realip_module \
--with-stream_ssl_module \
--with-stream_ssl_preread_module \
--with-stream_quic_module \
--with-threads \
--add-module=../nginx_modules/ngx_cache_purge \
--add-module=../nginx_modules/ngx_http_geoip2_module \
--add-module=../nginx_modules/ngx_brotli \
--with-openssl="../openssl"

make -j$(nproc)
sudo make install
出来上がったバイナリのバージョンを覗いて確認しておく。
/usr/local/sbin/nginx -V
nginx version: nginx/1.23.4
built by gcc 8.3.1 20190311 (Red Hat 8.3.1-3) (GCC)
built with OpenSSL 3.0.8+quic 7 Feb 2023
TLS SNI support enabled
設定弄り
systemd で管理している状態からなので、unit ファイルを弄って nginx-quic のバイナリにむける。
sudo cp /usr/lib/systemd/system/nginx.service /etc/systemd/system/nginx.service
sudo vi /etc/systemd/system/nginx.service
として以下の差分のように nginx.service を編集して daemon-reload しておく。
diff -u /usr/lib/systemd/system/nginx.service /etc/systemd/system/nginx.service
--- /usr/lib/systemd/system/nginx.service       2023-02-18 02:32:08.000000000 +0900
+++ /etc/systemd/system/nginx.service   2023-02-18 01:34:06.528332685 +0900
@@ -7,7 +7,7 @@
 [Service]
 Type=forking
 PIDFile=/var/run/nginx.pid
-ExecStart=/usr/sbin/nginx -c /etc/nginx/nginx.conf
+ExecStart=/usr/local/sbin/nginx -c /etc/nginx/nginx.conf
 ExecReload=/bin/sh -c "/bin/kill -s HUP $(/bin/cat /var/run/nginx.pid)"
 ExecStop=/bin/sh -c "/bin/kill -s TERM $(/bin/cat /var/run/nginx.pid)"

sudo systemctl daemon-reload
次に nginx で設定している対象のホスト 1 つを選んで HTTP/3 に対応する設定を追記する。
当然、このサイトの設定を変更した。
    listen 443 http3 reuseport;
    listen [::]:443 http3 reuseport;

add_header Alt-Svc 'h3=":443"; ma=86400, quic=":443"; ma=86400, '; 最後に /etc/nginx/fastcgi_params へ 1 行追記したら設定は完了。
fastcgi_param HTTP_HOST $http_host; 更に nginx の仮想ホスト設定 server ディレクティブ内で include fastcgi_params をした後、HTTP_HOST にホスト名をセットしてあげる。
HTTP/3 でアクセスした場合、どのみち HTTP_HOST にセットされる $http_host は空っぽである為、管理画面の動作が一部おかしくなるところがあった。その為の応急的対処。
fastcgi_index         index.php;
fastcgi_pass          php.example;
include               fastcgi_params;
fastcgi_param         HTTP_HOST example.com;
ポート開放も
HTTPS は 443/TCP を用いるが、中でも HTTP/3 の場合は 443/UDP を使用するのが一般的。
追加でサーバー側の Firewall とルーター側のポート開放も忘れずに行っておこう。
Nginx を実行する
設定ファイルに問題がないかを確認し、OK なら systemd 経由で再起動してあげた。
sudo /usr/local/sbin/nginx -t
nginx: the configuration file /etc/nginx/nginx.conf syntax is ok
nginx: configuration file /etc/nginx/nginx.conf test is successful

sudo systemctl restart nginx.service
実際にアクセスして HTTP/3 であることを確認する
今回行った設定の場合、ブラウザは初回に HTTP/2.0 でアクセスして Alt-Svc ヘッダを受けとることで HTTP/3 対応を知る。
よって HTTP/3 対応を認識した次のアクセスから HTTP/3 で接続してくる。
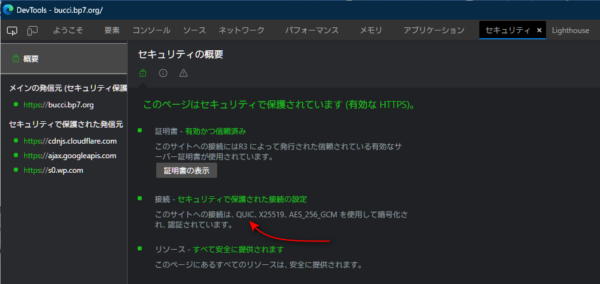
Chromium 系ブラウザであれば DevTools を開いてリロードした後、「セキュリティ」のタブを見てあげると QUIC と表示が出る。

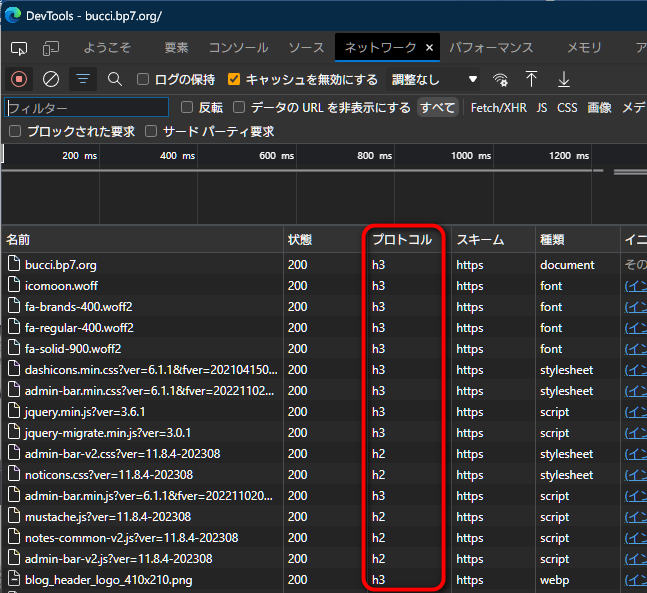
ネットワークタブを開いてあげれば「プロトコル」に h3 と表示が出ているので HTTP/3 であると分かる。

簡単にパフォーマンス計測
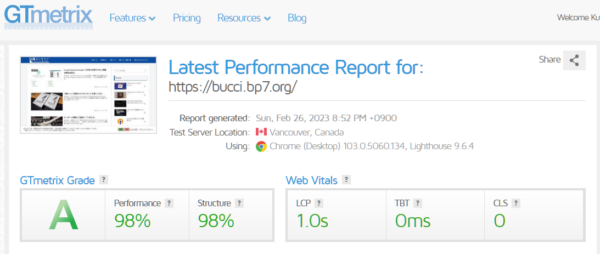
Google PageSpeed Insights は HTTP/2.0 までの対応だったので、GTmetrix を確認したらこちらは HTTP/3 対応だった。
あまりスコアは今までと変わった感じがなかったけど、数回計測した感じだと安定した結果に収まるようになったと思う。

また、筆者がよく使用するベンチマークとして nghttp2 に同梱された h2load を用いる物があるが、これもまた HTTP/3 対応となるように面倒なビルドをしないと正常に計測できない。
それはまた別のでビルドしたお話を取り上げようと思う。
おわりに
このサイトをホストしているサーバーが HTTP/3 対応になったので、対応ブラウザからアクセスする場合には体感不能なレベルだが速くなっているハズ。
正直言えば新しい物に触れたいという自己満足の為にやった感じなので、なかなか面白い作業だった。
- 2023/02/27 01:10
ビルド前に devtoolset 環境に切り替える記述を忘れたので追記、修正した。
- 2023/03/02 1:09
HTTP/3 でアクセスされた場合の
HTTP_HOSTに対する応急対処を追記した。


コメント